Swift NSTableView and NSArrayController

Swift NSTableView and NSArrayController
In my NSTableView column chooser example, I used a table data source and delegate to manage the table’s data. Just like iOS. Cocoa offers other options. In this example, I’ll look at “binding” to an NSArrayController.
Data Model
Array Controller
Table View
Binding the columns
Adding/Removing rows
Summary
Resources
Introduction
The Cocoa Bindings system allows us to write less code at the expense of doing more configuration in IB. Instead of writing a data source and delegate for our table, we are going to “bind” to an NSArrayController and have the array controller manage the data.
Data model
You can’t use Swift structs with Cocoa Bindings.
The Cocoa Bindings system uses Key-Value Observing (KVO). KVO works by intercepting the field access messages sent to the observed object. That means we need to write a KVO friendly Swift class.
So, my Person struct from the previous post is now a class that inherits from NSObject.
|
1 2 3 4 5 6 7 8 9 10 11 12 13 14 15 16 17 18 |
class Person : NSObject { var givenName:String var familyName:String var age = 0 override init() { givenName = "given" familyName = "family" super.init() } init(givenName:String, familyName:String, age:Int) { self.givenName = givenName self.familyName = familyName self.age = age super.init() } } |
In the ViewController, I create an array that holds some example data.
|
1 2 3 4 5 6 7 8 9 |
@objc dynamic var dataArray = [Person]() override func viewDidLoad() { super.viewDidLoad() // create some people dataArray.append(Person(givenName: "Noah", familyName: "Vale", age: 72)) dataArray.append(Person(givenName: "Sarah", familyName: "Yayvo", age: 29)) etc. |
Nothing unusual here, except for the dynamic modifier on the array variable. We are going to create an NSArrayController that will bind to this array via KVO. With the dynamic modifier, the messages sent to the array can be intercepted by the system. As a side note, you’d think that you would also need to mark the Person instance variables as dynamic also. It seems to work without doing so. I’ve included unit tests in the Github project verifying this – as well as the complete project which verifies this.
Array Controller
Now, in IB, find the Array Controller (it will be green) in the Object Library (^⌥⌘3) and drag one to your View Controller Scene. Select the array controller and open the Identity Inspector (⌥⌘3). Under Document, set the Label to “Person Array Controller”. You don’t have to do this, but it makes it less confusing.
Open the Assistant Editor (⌥⌘⏎) and select ViewController if it’s not shown. Now create an outlet for the array controller in the ViewController (control-drag).
Select your array controller in IB. Open the Attributes Inspector tab (⌥⌘4). Under Object Controller set the mode to class and the class name to TableBinding.Person. You need to fully qualify the Person class name with the project name (actually target/module name) which in my case is TableBinding. Swift sort-of-has implicit namespaces. This will allow the array controller to create new instances of your Person class.
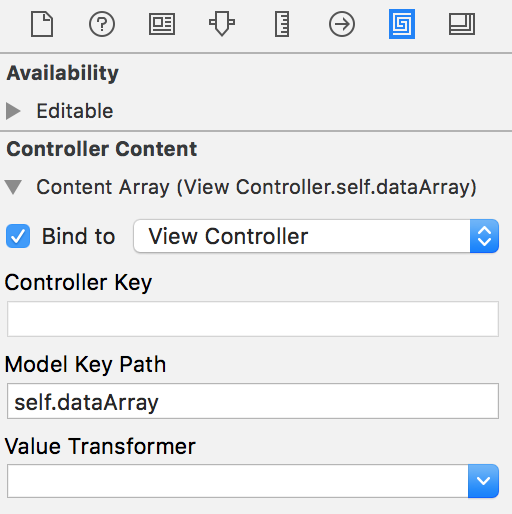
Select the array controller. In the bindings inspector, ( ⌥⌘7), open Controller Content. Bind to ViewController by selecting the checkbox. Finally, set the Model Key Path to self.dataArray.
In the connections inspector, ( ⌥⌘6), It will look like this:
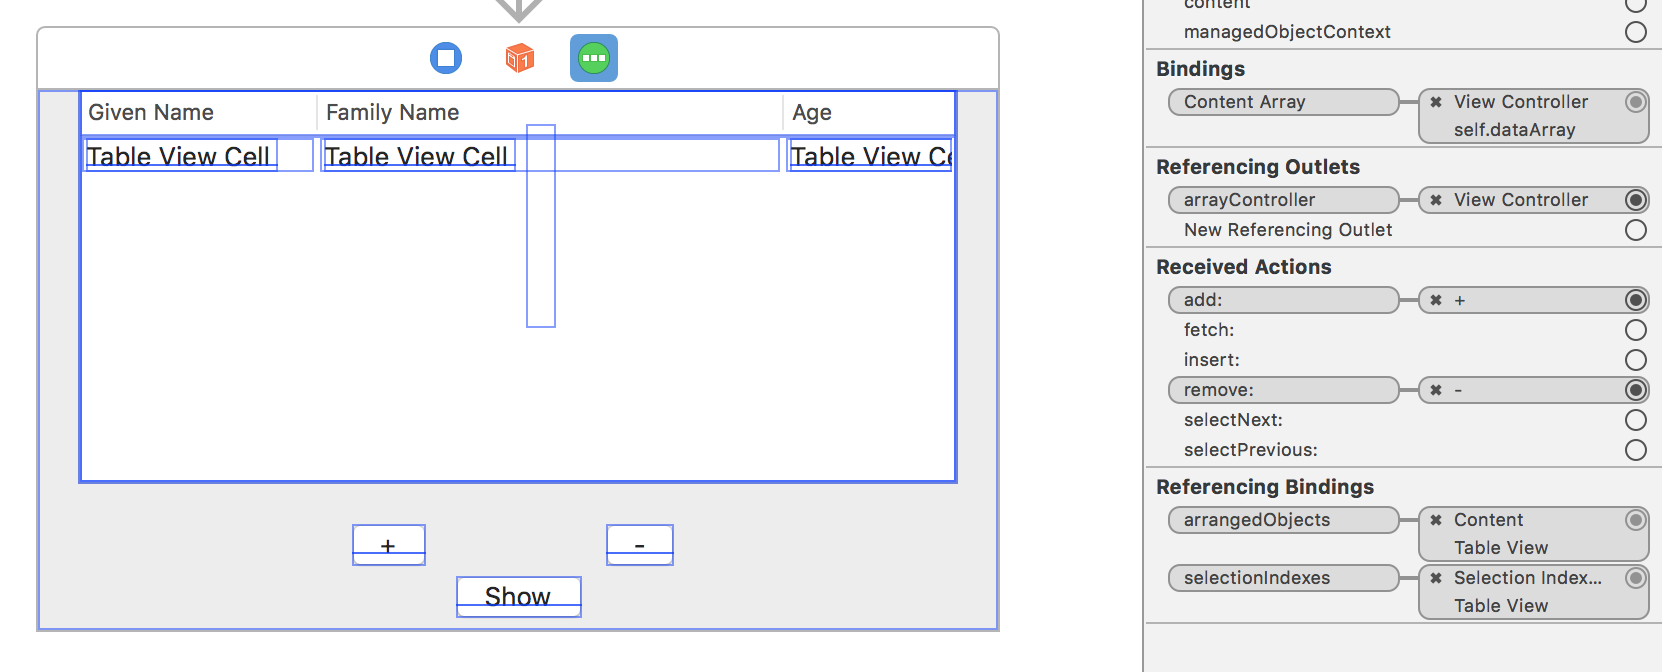
Table View
Drag a Table View from the object library (^⌥⌘3) onto your ViewController and size it. We’re going to add a few buttons at the bottom, so leave a bit of space there.
Now choose your Table view in the outline (to be sure). It is in the ViewController under the Bordered ScrollView and Clip View. In the Attributes Inspector (⌥⌘4), set the number of columns to 3 (one for each of the fields in Person). Open the Bindings Inspector (⌥⌘7).
There are two bindings we need to create for the table: the table’s content and selection indexes to the array controller.
Open up Table Content. Check the Bind To checkbox and select your array controller (you should see the name you set, “Person Array Controller”, in the Identity Inspector) from the option menu. The field that says Controller Key should be arrangedObjects, which is a field in the array controller. There is no Model Key Path to set. You might get a red checkmark, but it seems to be ok.
Scroll down a bit, open up Selection Indexes, and do the same: hit the checkbox, then select the array controller. The Controller key is selectionIndexes.
Binding the Columns
Now we need to bind each column to a field in the Person class.
In the outline, open up the table view and you will see 3 columns. Select the first one, open up the Attributes Inspector, and set the title to Given Name. You can also choose a title font here if you’d like. Make certain the state is “editable”. Now do the same to the other columns and give them appropriate names (familyName and age).
Now to set the binding. Open up the first table column, “Given Name”. You will see a TableCellView. Open that up too. You will then see an item confusingly called “Table View Cell”. It’s actually an NSTextField. (you can change the title in the Attributes Inspector if you’d like).
This is the hierarchy:
NSTableColumn -> NSTableCellView -> NSTextField
(the titles are: Given name -> Table Cell View -> Table View Cell)
You want to set the binding on the NSTextField.
Select the text field, and open the Bindings Inspector (⌥⌘7). Press the “Bind To” check box then select “Table Cell View” from the option menu. Set the Model Key Path to objectValue.givenName. (givenName is the Person field to which you’re binding the text field)
Do the same for the other columns, with the appropriate Person field name.
Go ahead and run the project. You should see the data in your table.
Adding/Removing rows
Now drag Push Buttons to your view controller to add and remove a row, and another to print the array to the console for debugging. Create actions in the ViewController for each.
Note that I’m using the arrayController outlet to modify the data and not the array directly.
|
1 2 3 4 5 6 7 8 9 10 11 12 13 14 15 16 17 18 |
@IBAction func addPerson(sender: NSButton) { arrayController.addObject(Person()) dispatch_async(dispatch_get_main_queue()) { self.tableView.scrollRowToVisible(self.dataArray.count - 1) } } @IBAction func removePerson(sender: NSButton) { if let selectedPerson = arrayController.selectedObjects.first as? Person { arrayController.removeObject(selectedPerson) } } @IBAction func showAll(sender: NSButton) { for person in arrayController.arrangedObjects as! [Person] { print("\(person.givenName) \(person.familyName) \(person.age) ") } } |
This will work, but one of the points of the array controller is to minimize code. Go ahead and comment out the add/remove actions. Control drag from the add button to the array controller now. You should see an action pop up that will include an add method (and a remove method too, so do that next for the other button).
One thing I haven’t found, is a hook or callback after these methods are invoked. In my hand written addPerson func, I scrolled the table to show the new Person. I don’t know how to do that with the array controller binding.
Do You?
Run the project, then add and remove rows.
Cool huh?
Click on a new Person to change the values. You can’t – even though you set the editable attribute on the table columns.
Select each of the column text fields (command click for multiple selection).
Open the Attributes Inspector. Find the option menu that says Behavior. Choose Editable.
That’s it. Run it again, add a row, and you should be able to change the values.
Summary
Cocoa Bindings are available for most UI controls. We looked at just the NSTableView and NSArrayController here. What this bought us was less code but more IB configuration. And as you see, you have to set exactly the right things on multiple items. Better than code? What do you think?
I'[m trying to learn how to do just this -thanks for the article but it’s not working.
I’m guessing you didn’t bind the array controller to the dataArray?
Even if I do this – I the cell contents do not render, the cells do, and I can select them, but they are blank 🙁
I just ran the Github project and it works.
I had the same problem and was able to figure it out by comparing your project to mine. You have to bind the Array Controller’s Controller Content to the ViewController. I didn’t find any reference to this in the steps provided however. So to clarify, you have to select the Array Controller in the IB and open the Bindings Inspector. Then under Controller Content check the box and bind to View Controller. The Model Key Path is self.dataArray. That binds it to the data in our Array so it can populate.
D’oh!
I’ve added screen dumps.
Thanks.
Nice tutorial. Thank you 🙂
With some screenshots that would have been perfect. Check the tool ‘Skitch’ to add nice comment on the screenshot.
I’m having a heck of a time getting this to work in my own Swift project. I think I may be failing on the KVO, but I’m not sure I totally understand that.
I have some Strings and Bools in my NSDocument subclass. I have a function that returns a pointer to the proper instance of that class from my NSViewController subclass. Then I bound fields to, for instance, self.document.someVar. This does not appear to work, at least I don’t seem to be seeing update. But it seems both of those would be NSObject and work OK, right?
Unless this is significantly updated, especially with some way for us to hook into the message flow, I think bindings remain easier to use, and especially debug.
It looks like you are binding the NSTextField for the Given Name column, but the NSTextFieldCell for the Family Name and Age columns. Is that intentional?
The Array Controller content is bound to the View Controller via self.dataArray. This works with Swift 3.3 but fails with Swift 4.1. Any ideas why this is so and any fixes would be appreciated.
Thanks much
I’m not surprised that things in Swift broke in 3 years 🙂 As I recall, dataArray relied on KVO to work. I’m guessing that’s what the culprit is. Maybe add @objc to dataArray and see if that works. If I have a few zeptoseconds to rub together, I’ll take a look.
Hello,
Thank you very much for your tutorials.
I’m a junior (not in age but in programming) and I’m trying to create a sample project in Swift with a NSTableView using a NSArrayController/bindings WITHOUT InterfaceBuilder.
This has proven to be very challenging to say the least. I’m now struggling with sorting.
Would you mind creating a sample. I’m more than happy to send you may code if you want.
Anyway thanks again for all you are sharing.
When I get a few nanoseconds to rub together I’ll make an example.
Nanosecond as this is so simple I hope 🙂 .
Any help would be fantastic. There is absolutely no sample on the Internet showing these topics especially in Swift.
I loaded my sample on https://www.dropbox.com/sh/7mg8q3ta0qf99wh/AABJYk3sFUVTMlqLJf6yM82ya?dl=0 .
It will give you an idea. My goal is to be able to build a Table from scratch without IB with a JSON configuration file.
Thanks a lot.